Interested in making your own tempeh? You should be! Homemade tempeh is the best tempeh! This guide will teach you how to make tempeh, step by step.

If you're reading this I'm guessing you're a big-time tempeh lover, like me! Anyone interested in making homemade tempeh has to be a pretty big fan of the stuff.
But let's just say maybe you're not. (I don't know why you're here, but stick with me.) Homemade tempeh might just change your mind. It's so much better than store-bought.
The world is full of tempeh haters, and I find that their biggest complaint is generally related to tempeh's flavor. Tempeh can have a funky, bitter flavor that some folks aren't a fan of.
Homemade tempeh, unlike lots of the store-bought stuff, generally has no bitterness to it. Just a mild, nutty, slightly yeasty flavor.
Having said that, making tempeh can be a bit labor intensive and it takes a few days. I often recommend it for people like me, who love tempeh to begin with and want to enjoy it at it's best.
Today I'm going to teach you how to make tempeh.
But first, let's start with some background!
Jump to:
Tempeh Basics
Maybe tempeh is a new ingredient to you and you have no idea what I'm talking about.
Tempeh is a fermented soybean product that originated in Indonesia. It's an excellent plant-based protein ingredient that's super versatile and pretty easy to cook with, which is why it's a favorite food among many vegans and vegetarians.
In tempeh, soybeans are bound together with a type of fungus. That's right: fungus.
Don't freak out! Fungus has it's place in culinary applications. Mushrooms are fungus, after all. Rhizopus ogliosporus is the specific type of mycelluim used to make tempeh. In tempeh, soybeans are actually bound together into a solid block of mycellium. We'll talk about the actual process of growing fungus around soybeans in the tutorial and recipe below.
Tempeh can be purchased at most supermarkets, usually in the refrigerated area of the natural foods section, near the tofu. If you've never tried tempeh before I highly recommend you at least buy some before attempting to make your own.
Ingredients You'll Need
Here's what you'll need to make your tempeh:
- Soybeans. You'll need dried soybeans, which are generally available in Asian markets, health food stores, or online.
- Rice vinegar. This should be available in most regular supermarkets, either in the international aisle, or near the other vinegars.
- Tempeh starter. You'll probably need to buy this ingredient online. Here is a link to the one that I use. Once you've made a batch of tempeh, you can make your own starter as well. I'll talk about that a bit below!
Tip: These are the basic ingredients for making traditional tempeh, but tempeh can and often does include other ingredients. Beans such as chickpeas, lentils and black beans may be used in place of soybeans, as can some seeds such as hemp seeds. Other seeds or grains can also be used in combination with soy beans or or other beans to make tempeh. Try experimenting with different ingredients once you get a feel for the process!
The Process
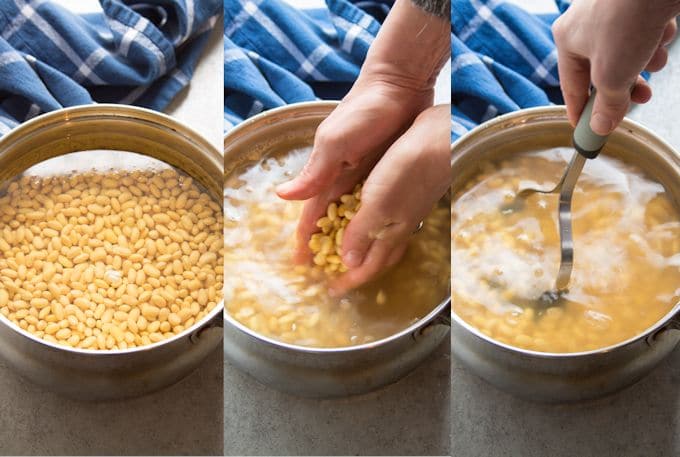
Measure out 2 cups of soybeans. Place them in a large pot and cover them with water. Make sure there's plenty of room in the pot and that the water comes up at least twice as high as the beans — they'll expand a lot as they soak.
Soak the beans overnight. 12 hours is the perfect amount of time.
Hull the Beans
Now for the work.
Your tempeh starter may include instructions to do this by massaging the beans or pressing on them with a potato masher. If you go this route, plan to spend at least 30 minutes, and up to an hour, removing the hulls.
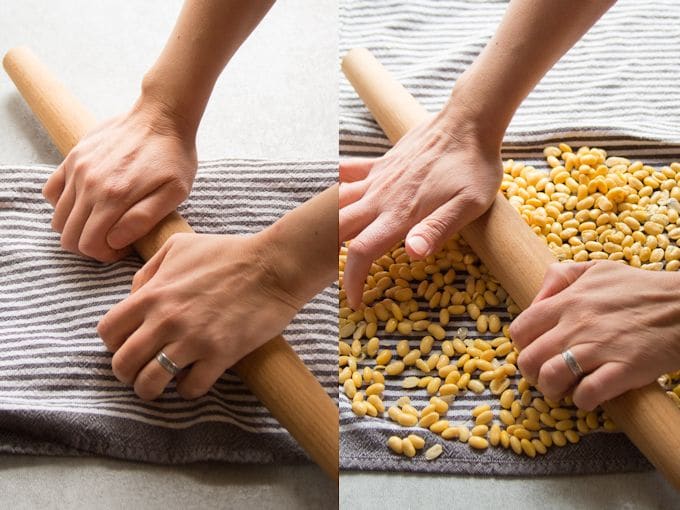
What's worked better for me is spreading out the beans on a tea towel and smashing them with a rolling-pin. Ten minutes and the job is done! Alternate folding the towel over the beans and using lots of pressure, and then rolling the beans without the towel and using more pressure.
I've read other tips to try using a stand mixer or food processor with a dough kneading attachment. I tried both and pretty much got nowhere. But feel free to experiment and see what works best for you!
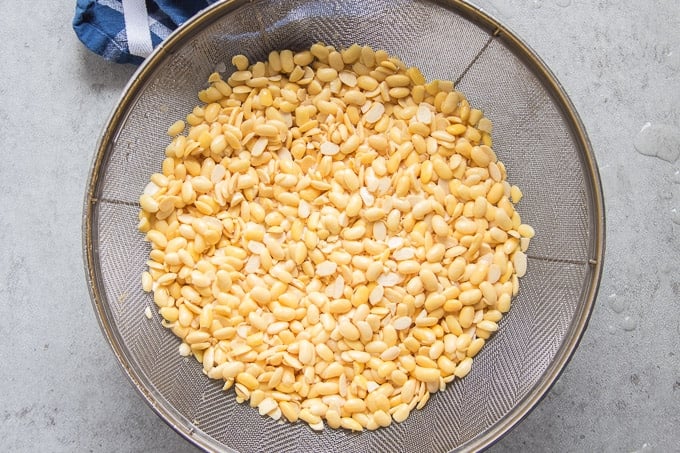
In any event, your goal is to split the beans in half. Once they split, the skins will slip right off. and when you can see that the beans are split, it's easy to confirm that they've been hulled.
Separate the hulls and discard as many as you can as they come off the beans, but don't get too hung up on this step. I find putting them into a fine mesh strainer and hitting them with high pressure water pushes many of the hulls to the bottom and sides of the colander.
Boil the Beans
Place the beans back into a pot, cover them with a few inches of water, and boil them. Let them cook at a rolling boil for 1 hour. You'll notice some of the remaining hulls floating to the top of the water while they cook. Skim them from the top and discard them as this happens.

Dry the Beans
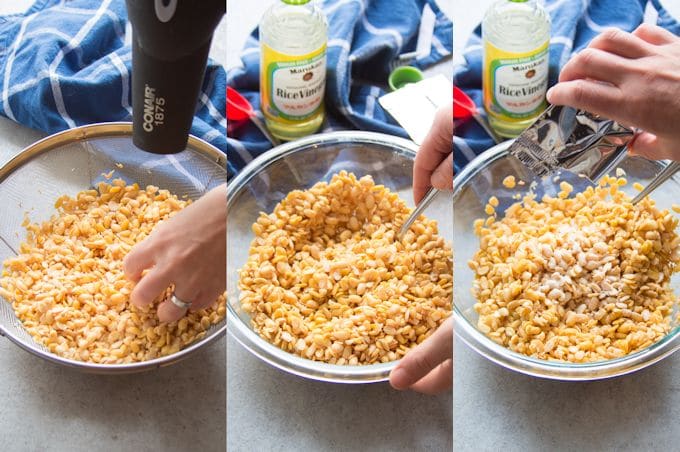
Once the beans are finished boiling, drain them into a mesh colander. They need to be cool and dry to the touch before proceeding with the next step.
Your starter may instruct you to physically dry them with a towel or hair dryer. I found toweling them off to be pretty ineffective, so I dry them with my hair dryer on low. Keep them in the colander or in a bowl when you do this (don't arrange them on a flat surface or anything like that — they'll fly everywhere!).
Place the dry beans into a large mixing bowl and add 2 tablespoons of rice vinegar (or white vinegar). Stir well, then add the starter. Stir everything up again until thoroughly mixed.
Shape It
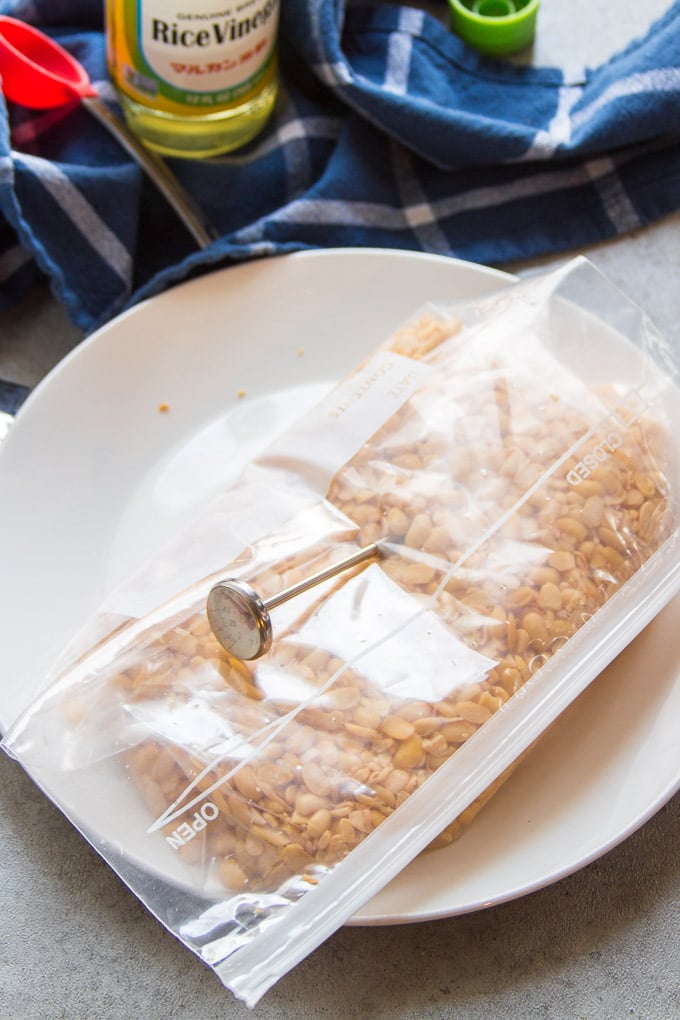
Tempeh needs to ferment in a container with just a bit of ventilation to prevent too much moisture from accumulating. A large freezer bag with lots of pinholes works great. Place the beans into the bag and arrange them in a 1-inch (approximately) thick layer.
Tip: Traditional tempeh is fermented in banana leaves. Look for them in Asian markets if you'd like to give this a try.
Incubate
Tempeh is fussy! It needs to ferment at between 85°F and 90°F. Much cooler and the mycelium won't grow (giving rise for undesirable microorganisms to grow instead). Much hotter will kill it.
This sounds tricky, but it's really not. First off, stick a thermometer into your beans. Poke a hole through the bag and stick it right in there.
During the summer, you may find that room temperature is warm enough. During the cooler months, I simply place everything on a plate, turn on my oven light, and set the plate near the back of the oven, close to the light. An hour or so later, I'll take a peek at the temperature. If it's too cool, I'll take the plate out of the oven, heat up the oven just for a minute or two, then put the plate back. If it's too hot, I'll move the plate away from the light.
Keep an eye on the temperature, but don't lose sleep over it. My temperature usually dips a bit below 85°F or jumps above 90°F for an hour or so here and there, and my tempeh turns out fine. Just do your best to keep it from staying consistently out of range.
After about a day, you might notice the temperature of your tempeh climbing. This is good! Once the fermentation really gets going, the mycelium starts to generate its own heat. Move the tempeh away from your heat source, or remove it completely. My tempeh's temperature often climbs up near 100°F, without an additional heat source, during this time.
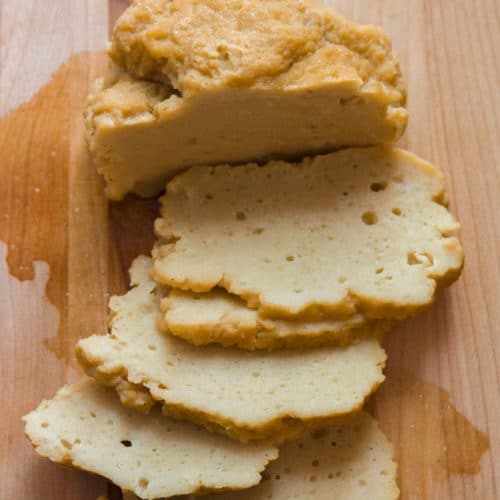
Soon you'll start to see some white fuzz growing on your beans. This is the mycelium. And over the next day or so, the mycelium will start to completely cover the beans. Eventually the mold will completely envelop the beans and you'll end up with a solid cake of mold and soybeans. Your tempeh is now done!
Harvest Some Tempeh Starter
If you'd like some more starter for future batches, you can get some from your new tempeh. Just cut off a small piece (a 1-inch cube is more than enough) and return it to incubation to allow for continuation of the fermentation process. Again, you'll want a vented container and a temperature between 85°F and 90°F. I use a small bowl covered with plastic wrap with pin holes poked in it.
Let the tempeh continue to incubate. The mycelium will continue to grow. It might get really fuzzy, and it should start to turn gray or black. Mine usually ends up looking like dryer lint.
When you see lots of gray and/or black fuzz, remove the temeph from the incubator and let it sit out at room temperature to dry out. This can take 3 to 7 days, depending on the temperature and humidity.
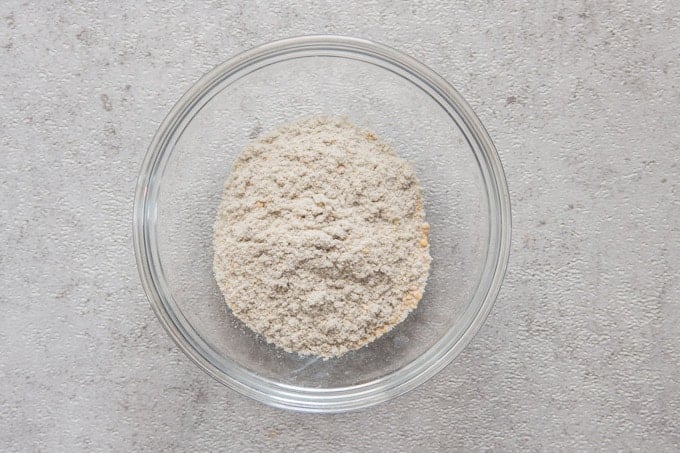
Once the tempeh is dry, grind it up. You can use a mortar & pestle or a small blending device like a coffee grinder. Add 2 parts rice flour, by weight. Seal up the tempeh in a storage container or plastic bag, and refrigerate until you're ready to use it. You'll need 1 teaspoon for future batches of tempeh.
How to Store Homemade Tempeh
Tempeh you make yourself won't have quite the same shelf-life as the store-bought stuff, since it's made fresh and without preservatives. Keep it in an airtight container and it will stay fresh in the refrigerator for up to a week, or freeze it for up to three months.
Cooking with Tempeh
Now that you've made a batch of tempeh, you'll want to incorporate it into a delicious recipe. Tempeh is excellent pan-fried, stir-fried, crumbled in sauces and stews, braised, baked, and even grilled. It can be used as an alternative to tofu in many recipes where a different flavor or texture might be desirable.
Some folks like to steam tempeh before incorporating it into a recipe. Steaming softens up tempeh and removes much of it's bitterness, which is mostly an issue with store-bought tempeh, although your homemade tempeh may start to taste bitter as it ages in the fridge. Read this article on how to steam tempeh to learn exactly how do it's done.
For more details and ideas, have a look at my complete guide to cooking with tempeh, or try one of these tempeh recipes.

Ready to make some tempeh and then start cooking with it? Here's your printable recipe, below. And be sure to refer to the details above for guidance.
Like this recipe? If so, please stop back and leave me a review and rating below if you try it! Also be sure to follow me on Facebook, Pinterest or Instagram, or subscribe to my newsletter for more recipes like this one!
📖 Recipe

Homemade Tempeh
Ingredients
- 2 cups dried soybeans
- 2 tablespoons rice vinegar
- 1 packet tempeh starter (or 1 teaspoon if using tempeh starter harvested from a previous batch)
Instructions
- Place the beans into a large saucepan or bowl and cover them with several inches of water. Let the beans soak for about 12 hours.
- Split the beans in half and remove the hulls. To do this you can either massage the beans vigorously by hand, hit them with a potato masher, or arrange them on a towel-lined flat surface and roll them with a rolling pin.
- Transfer the beans to a fine mesh colander and rinse them under high pressure water. The hulls should begin to settle to the bottom or be forced to the sides. Pick out as many of the hulls as you can.
- Transfer the beans to a large saucepan and cover them with several inches of water.
- Place the pot over high heat and bring the water to a boil.
- Lower the heat and allow the beans to boil for 1 hour. Skim any loose hulls from the surface of the water as they float there.
- Drain the beans into the mesh colander.
- With the beans still in the colander, dry them gently with a hair-dryer on low power. Allow the beans to cool if they've heated up too much.
- Once the beans are cool and dry to the touch, transfer them to a large mixing bowl.
- Add the vinegar and mix well.
- Add the starter and mix well. Stir for a few minutes to ensure even distribution of the starter.
- Gather a gallon sized plastic zip bag and use a pin to poke holes, separated by about ½-inch, in both sides of the bag.
- Transfer the beans to the bag. Set the bag on a plate and distribute the beans in a 1-inch thick layer. Fold the bag over the beans.
- Use a meat thermometer to poke a hole through the bag, into the beans.
- Place the beans in a warm (not hot) location, such as at the back of your oven with the light turned on.
- Check the beans after 1-hour. The temperature needs to be between 85°F and 90°F. Move or make any adjustments if needed to raise or lower the temperature.
- Check the beans every few hours. After about 24 hours, the temperature may begin to climb and you may be able to remove the beans from the oven.
- White mycelium will begin to grow on the beans. Continue checking the beans until they are completely embedded in a block of mold (1-4 days).
- Your tempeh is finished. Cook it right away, or seal and refrigerate for up to 7 days, or freeze for up to 3 months.

This is an awesome guide, Alissa! Question: should the mold be fuzzy white? I followed your guide and the tempeh definitely got the white I see in your photos, though not to the extent I see in your first photo in this post. So I kept it going and at about 24 hours got fuzzy white mold on the top of the tempeh (like the fuzzy mold you'd see on moldy bread, but white in color), which I don't see in your photos or any photos in the guides I've seen. I wasn't sure about it, so stopped the process and just cut off the top. I know it's hard to give an answer w/o a photo - but is the mold you see when you make tempeh fuzzy like bread mold, or should the tempeh have smooth white texture/color, similar to the mold you'd find on the freshest stuff in a store?
Alissa,
Your blog is wonderful. You love food and love writing and the visual appeal of your page is obvious.
I used your page as a guide to my first batches of tempeh and they have all come out fine. Some of comments you received talked about using less water and resources? I was concerned about this too. So I have modified the approach. I also do not like boiling the beans, because I know some of the protein leaves the beans when they are boiled, since that is how soy milk is made.
So I soak 3 coups dry beans, (528gm) making 8 cups wet beans. I mash them with a potato masher to loosen hulls. Then I pour the hulls into a colander over a pot. Remash, pour, repeat 10-20 times -reusing the water. Then I steam the beans in my bamboo steamer racks, by laying them on cheesecloths. Steam for ~ 15 minutes or more? I like firm beans. Pick them up in the cheesecloth and wrap them in a dry cotton towel. Wring out the excess water. They will be very dry. Put them in a pot and the pot in the sink which has cool water in it, stir to cool them to 91F. Add the vinegar. (3 tsp) stir. Add the starter, stir.
For fermenting I use a 9 inch square 2 inch deep cake pan. I have a 0.4 inch high bamboo support grid in the bottom. On top of that goes a bamboo sushi mat which was trimmed to fit the pan width. Just lay the beans on the mat, filling he pan. I poke 20 holes with a round toothpick for air circulation. Temperature probe can be in the tempeh if you have one. I have also just set it on top of my 10.5 inch square yogurt maker. I put chopsticks on the pan edge and a second sushi mat on top, then a square of was paper to keep bacteria from falling on it. it makes a 9 inch square of tempeh 1.6" thick., about 900 gm.
So this means I don't need plastic bags, steaming is fast and the beans are basically dried instantly. My 9 inch pan is unmodified, has no holed drilled in it.
I used peas, lentils garbanzo beans and soybeans. In my last batches. I will try the nest one leaving the hulls on.
Thank you for your lovely blog and your enthusiasm.
Hi Alissa,
You know a lot about tempeh, so I hope you can help me. I seem to have run into a problem that isn't discussed anywhere. Oh joy! I steamed tempeh today to marinate and bake it, to try to to convince my wife to like it. (So far, all other attempts have failed; the least offensive was crumbling it and using it as a ground meat substitute.)
I hadn't steamed any ever before and to my surprise the steaming turned it into a rock, it seems (the pot didn't cook dry). Everywhere it's said steaming is supposed to do the opposite and prepare the tempeh for soaking up the marinade.
Have you ever had this happen? Do you think there's any hope the marinade will bring the tempeh back to life? I'd really hate to waste food, but it's close to inedible right now. And I'm worried to chip a tooth.
Thank you so much in advance for taking the time for my problem!
Hi Sam! I've never heard of that happening before! How long did you steam it for? Steaming it for too long or using tempeh that's a bit dated are the only things I can think of. Try starting over with a new block and steaming it very briefly. I actually have a method I use when I'm feeling lazy where I wrap it in wet paper towels and microwave it for 3 or 4 minutes, so you could give that a try. Good luck and let me know if it works out!
Dear Alissa,
since almost one year now I regularly produce home made tempeh with great success and much enjoyment in the house. I figured some adaptions to the process you mentioned that i want to share.
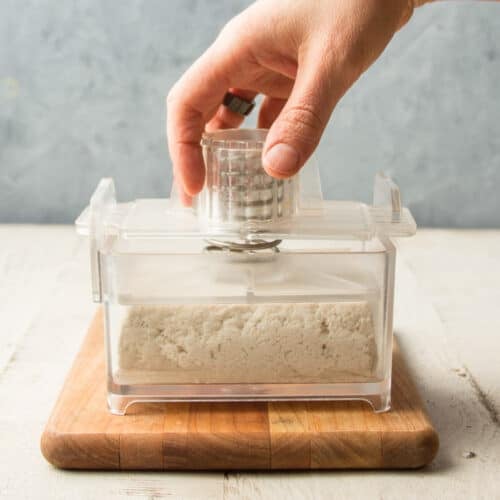
1. In stead of using a plastic bag I take a flat food storage container so I avoid producing plastic waste with each batch.
2. In order to get a proper ventilation in the container i make some holes in the soybeans (fotos). Those holes will close once the tempeh is growing all over. I leave the container uncovered but put a bigger lid with a spaceholder on it. This way the beans don`s loose its temperature and get enough air.
3. The temperature: Initially i used only a yoghurt maker but it did’t work well. It was too hot and the growing did not bring good results. I think the culture died because of overheating. Then I thought that there must be a way to regulate the heading of the yogurt maker so to not go pass or go under the desired cultivation temperature of 29-32°C or 85-90°F. I found a way.
Yoghurt makers (simple ones without regulation) produce usually something between 37-45°C or 100-115°F. By installing a "digital temperature regulator" or "digital temperature controller/ thermocouple" like the one I found on ebay for 15€ (about 15$) to your yogurt machine you can regulate it very well to ideal tempeh heat and have great results. All you need is to carefully read the indstructions on how to connect the wires or ask some skilled craftswoman/man to do it for you. The power supply of the yogurt maker gets cut, the regulator connected so it switches the maker on and off according to the desired temperature set in the regulator.
You will have to stick the sensor of the regulator into the beans and let the tool do its work. This step improved the continuity of tempeh quality a lot. The step you mention Alissa with doing your own culture works also very well with this tool.
4. Lately I found a regional source (Germany) for pealed beans which makes the process a lot easier!
This is my experience so far. I hope someone can benefit from it.
Best,
Christian
Tempeh is a powerhouse food, but it often gets overshadowed by its more popular cousin. Thanks you for sharing thông tin quý giá.
Hi there - you mentioned that the when we place the tempeh in the bag (I put mine in a food grade wrapper) - we should have as many holes and to also make sure that they are dry. Since I'm from a hot & humid country, I just leave my tempeh in a large covered bowl for 2 days (48 hours)... I've noticed that after 48 hours my tempeh is wet from the condensation but the mould has grown all over well and I usually place it in the fridge immediately. However, I've noticed that when I use it to cook, all the beans crumble and the mould does not hold it together as well.
What am I doing wrong here? Should I cover my beans in a tea towel after packing it in the food grade wrapping paper and leave it (in a covered bowl) or should I leave the tempeh outside (not in a covered pot)?
Any suggestions would be greatly appreciated! :-D
THANKS!!!
It's hard to say without seeing your tempeh, but I'm guessing it just needs a bit more time. I'd check to see how solid it is before placing it in the fridge. It also seems possible that the mold is growing on top but not completely penetrating the layer of beans. Try spreading it out in a thin layer in a bag instead of a bowl to see if that helps. Good luck!
Hi, I've made tempeh and I want to make starter from it seems questionable to leave the mature starter tempeh out for multiple days to let it dry. Do you have any thoughts on that? I figure it's probably usually fine but I would like to be a little more sure.
I've never had a problem. My thinking is that the mycelium would inhibit any harmful bacterial growth. One thing you could try, to be on the safe side, is drying it out in the fridge. It's pretty dry in there and the mycelium should have sufficiently grown at that point, so I think it would work. I'd love to hear how it turns out if you try it!
Hi! So it’s my first time making tempeh and it definitely looks like dryer lint on top. Can I set some of it aside to make more and still eat the rest? Should I scape the lint looking stuff off or is it safe to eat?
It sounds like it fermented a little too long. Did it go through a stage where it looked like normal tempeh? I'm afraid I can't be sure without seeing it go through the process myself. You might want to play it safe and start over.
I need help. I have so far attempted to make Tempeh twice, but my problem is that my food dehydrator will not go to a setting below 35 degrees C. I constantly use my oven for cooking and keeping stuff warm, but it's used for others too, so using the oven isn't an ideal option.
1st batch, I didn't remove husks. 2nd batch, I did. 1st batch came out better than the first, and I have seen loads of videos where the presenters state "you don't need to go to all the trouble of removing the husks," and indeed, my first batch worked even better than the second . I threw the 1st batch into the compost heap after 5 days of nothing happening. After a week, I happened to go back to the compost heap, and it looked absolutely bloody amazing. But there was obviously no way I could retrieve it now! That was totally complete with husks, too...
I meticulously rinsed and scrubbed the soy beans for the second batch, and removed an awful lot of husks when washing, and a good few more once cooked....I tried putting the tempeh (second attempt) into a small food-isolating bag (the kind lined with a plastic tin-foil, used for small lunches...) but of course the air has to circulate, so I think even though the mould began to form, the soy beans began to go mushy and mouldy (not in a good way!). My mum has an electric blanket she doesn't want, I might try to use that - but I'm beginning to lose heart....
Sorry you're having trouble! Have you been monitoring the temperature of your tempeh? That's really important, if the temperature is off that could be what caused the wrong type of mold to form. An electric blanket might work, just make sure to stick a thermometer in the beans. Also, are you poking holes in the bag for air circulation? That should help keep the moisture level down. I'll even sometimes use a paper towel to wipe out any condensation that forms inside the bag.
Thank you for your article it was very informative.
I make my tempeh in the instant pot. I cook the beans, don't dehull or split them, for 20 minutes, dry them off add the vinegar and mold spores then back in to the instant pot on the yogurt mode. I put he metal trellis in and put the beans in two plastic boxes that I have put holes into. I just put it on for 16 hours, rota the boxes and put it on for another 16 hours. works perfectly every time.
That sounds so simple! I do mine the traditional way but I am so trying this. Thanks. Loved this article as well. Very informative.
Hi Alissa,
Thank you for your article. I have followed your recipe and made the tempeh successfully. They are so good! One thing I wanted to ask is how is one serving only 173 calories when the raw ingredients of 2 cups of soy bean were already close to 2000 calories. I do track my calories intake religiously and also wanted to enjoy tempeh as a staple in my day to day meal, but wanted to be sure of my intake.
Please help.
1 cup of raw GREEN soybeans has only 376 calories.
Anybone with an instant pot- tempeh can be incubeted on the yogurt setting. 12 -16 hours there should be growth of mold.... shut off pot keep covered. 48 hours total time. Works great. Seceral articles and videos out rrgarding this method
Thanks so much! I just got an Instant Pot, so I'll have to give that a try!
I'm going to cut off a small piece of my store bought tempeh that's just ripened to make a tiny piece of tempeh.
I'm also going to cut off a small piece of this store bought tempeh and let it ferment further till it turns black. Then I'll take it out to dry off. Pound it with a mortar & pestle and add an equal amount of flour. I'll store it in a jar and place it in the refrigerator.
Will the above be right?
It might work, but it might not. Some store-bought tempeh is precooked to stop it from fermenting. You can look for a label that says something like "cooked and ready to eat," but I don't know of any brands that are uncooked for certain. I'd love to hear how it works out and what brand of tempeh you use if you try!
Hi, thank you for this article. Not only was it informative, but it had me in stitches at the language at times.It's always a deep pleasure to read material written by someone who knows their subject inside out. I've just started to introduce soy products in. my diet and as a whole food-er that includes making stuff from scratch.
I've only tried making my own soy milk this far. My main concern there, which bings me to write this comment, is that with those instructions and yours in this article, is the enormous amount of resources used. With soy milk, I was shocked at the amount of water in the recipes... water for soaking, water for cooking and apparently fresh water yet again for the final product. On top of all the water used, there's the long cooking times for the beans as well, sucking up a lot of power. With your tempeh, the use of oven as incubator and the hair dryer that made me sit up and take notice.
It struck me that your way of producing your tempeh, delicious as it seems, doesn't take into account that clean water and power are becoming increasingly problematic issues in themselves Surely there must be better, more efficient ways even in households to get these jobs done? I have been thinking of pressure cooking and maybe a small egg incubator or something. What are your thoughts on this subject? Btw... since you do seem to know everything about soybeans, is the water used to cook soaked soy beans safe to consume? (I'm thinking of my soy milk.)
I live in South Australia, the driest state of the driest continent with a completely incompetent government when it comes to address clean power for the future so these two subjects are close to my heart. I don't mean to sound disrespectful or offensive in any way. I truly enjoyed your article.
I'm glad you found the article helpful!
There are certainly modifications you can make to minimize resource consumption.
With respect to the water, this method does use a lot. I'm honestly not sure if the water used to boil the soybeans is drinkable, although I don't see why it wouldn't be. Your best bet might be to find a way of reusing it that doesn't involve consuming it, such as for watering plants.
If you use the oven as an incubator you probably won't even need to turn it on. I used the light as my heat source, and when my kitchen is warm I don't even need that.
I'm sure you could skip the hair dryer too. I haven't had luck towel-drying the beans, but I think spreading them out and letting them dry naturally should work just fine.
I hope that helps!
You could put the used water on your garden.
Here are several time and resources-conserving ideas which I incorporate into my tempeh process.
1. Cook the beans in a pressure cooker. This will decrease the cooking time and enable you to lower the heat once the pressure cooker has reached pressure.
2. Don't bother hulling the beans. It may have some impact on the taste, but I've never taken the time to hull, and I'm happy with the results. You don't need to split the beans either. This just means you'll have a slightly less homogeneous tempeh. The mold will grow into the larger spaces between the beans, so the end product will be less tightly woven.
3. I sometimes skip the soaking step and cook the beans raw in the pressure cooker. Total cook time is not much more and I always take advantage of the tail end of the pressure cooker's cooling period. However, I think this may impact the taste and digestibility of the final product, but I can only say that anecdotally.
4. If you do soak the beans, you don't need to use an excess amount of water. Find a container that is 2-3 times the volume of the beans and fill it up with water. The beans will expand to fill the container and leave a minimum excess of water.
5. You don't need the oven, stove, or hair dryer to dry the beans. After cooking, simply drain the beans and spread them on a baking sheet to air dry until they are 90 degrees F and ready to add the starter. If the beans are still hot, they quickly evaporate any excess moisture.
6. You don't need to use single-use plastic when incubating the tempeh, but you do need to have an incubation container that allow the right amount of airflow. I don't know exactly what the "right amount of air flow" is, but I can say I have used two glass bread pans stacked one-into-the-other and the tempeh colonized as it usually does. The only airflow was the crack between the bottom and top breadpan.
7. During colder seasons, you do need to use electricity to get the right incubation temperature. The most efficient way that I have found is to use a pet heating pad. I have a "K&H Manufacturing, LLC, 4 watt, 120 volt pet heating pad". You just plug it in and it will automatically heat to 90-100 degrees F. I just set the incubation container on it and let it sit for 24-48 hours. This pad doesn't use a lot of electricity, but I don't know enough about electricity to put its use in context with something else. It'd be interesting to know how this compares to a standard LED light bulb.
8. Finally, you can improve your resource efficiency if you make larger batches. But that means you'll need to find a way to preserve all the tempeh you've made. I don't know of a way to preserve tempeh other than the freezer, and that may not be an option for some people.
Hope that helps!
In retrospect, I think I've underestimated the importance of drying the beans and allowing for proper airflow. Some of my batches have smelled fishy and ammonia-like. Not a pleasant experience. Having said that, I'd like to retract my idea about using two glass bread pans. I don't think this method allows for proper airflow. A better idea (which I have yet to try) would be to use short plastic containers that have holes poked in. You don't want to make the tempeh too thick or it won't have good airflow.
I make tempeh using an Instant Pot Ultra 6 QT as the device for steaming the beans and as the incubator using the Yogurt function on Low. I put the prepared beans in a 6 by 4 Sterilite 3 cup container that I has holes every inch around the lid and bottom. You can stack two container in a steamer basket. One container I made used Adzuki Beans. After 18 hours in the incubator the container temp was 95 degrees F. I moved the container to a wire rack sitting in a quarter sheet pan that was sitting on top of my fridge. After 14 hours the temp topped out at 99 degrees. It was one of my best containers. That block of tempeh measured 5.75 inches long, 4 inches wide, 1.5 inches thick, and weighed 14 ounces.
Unfortunately I had an issue with a container that used 3/4 cup Adzuki beans and 1/2 cup green mung bean. I didn't track the temp as closely so after 18 hours the container in the incubator was 103 degrees F and then after 14 hours on the wire rack the temp topped out at 122 degrees. Unfortunately this container had a decided ammonia smell and taste.
I believe the problem is that second container overheated so I need to track the temps more closely. I have noticed the times I have used the green mung beans the container temp seems to be higher. A previous container using green mung beans only topped out at 113 degrees with a slight ammonia smell.
I'm exploring other options for incubators and containers that are approximately the same size.
Hi there..I started the recipe Monday and today is Friday. I've been babying it with a heating pad and turning it when needed. The white mold is only present on the 2 ends and there is some brownish color on some of the beans. Should I continue incubating or is it trashed?
Thanks for the information.
If you haven't gotten any mold towards the center by now I'd start over. Are you monitoring the temperature with a thermometer stuck in the beans? I'm thinking a heating pad might get them too hot, and maybe the browning is from the beans drying out. They don't need much heat to get the temperature in the right zone - an oven with a light should be plenty. I hope that helps! Good luck!
This was such a fun read!! As a long time lover of tempeh, I loved learning more about my favorite form of protein and was fascinated by your recipe to make your own tempeh!! :)
Thank you so much! I'm glad you found it helpful!
Hi, When i visited Bali i discovered tempeh and loved it, but it was kind of like a sweet chilli brittle, crunchy and spicy with sweet and hot chilli. I have never seen this again and would love to learn how to recreate it. Do you know how - can t you post instructions for the lovely Bali style Tempeh?
Many thanks
Oh, that sounds delicious! I've never had it that way, but I'll definitely start experimenting to see what I can come up with! Thanks so much for the inspiration!
https://dailycookingquest.com/tempeh-kecap-fried-tempeh-in-sweet-soy-sauce.html
is it anything like that? that sounds amazing
Maybe you're looking for "kering tempe" its basically slice the tempeh small&thin then fry them to crisp. Then cook it in mixture of sweet soy sauce, tamarind, palm sugar, with some galangal, shallot, chili pepper. Some variations include peanuts, potato chips, anchovies.
Indonesians also love to deep fry our tempeh, with or without batter. Then eat it with a side of white rice and a million variations of hot sauces
Any idea if there are beneficial bacterias or probiotics in tempeh and if it iis compromised when the tempeh is fried or heated?
Cooking does kill them, but I *believe* I've read that you still get some of the benefits. I can't remember where I might have read that though (possibly in Eat To Beat Disease by Dr. William Li), so don't quote me on it! :)
Good article!! I've added garlic onion, sesame seeds and anything else I have had handy when Making tempeh. You Must try making it with beans; garbanzos, black and kidney are great, No need to hull them and they taste great. Thanks again for a great article.
I'm glad you found it helpful! And those sound like great ideas - I'd never have thought to add garlic or onion, but I bet it gives the tempeh great flavor. Definitely giving it a try with my next batch!!